Showing posts with label cotton. Show all posts

Thursday, February 19, 2015

Weaving Green

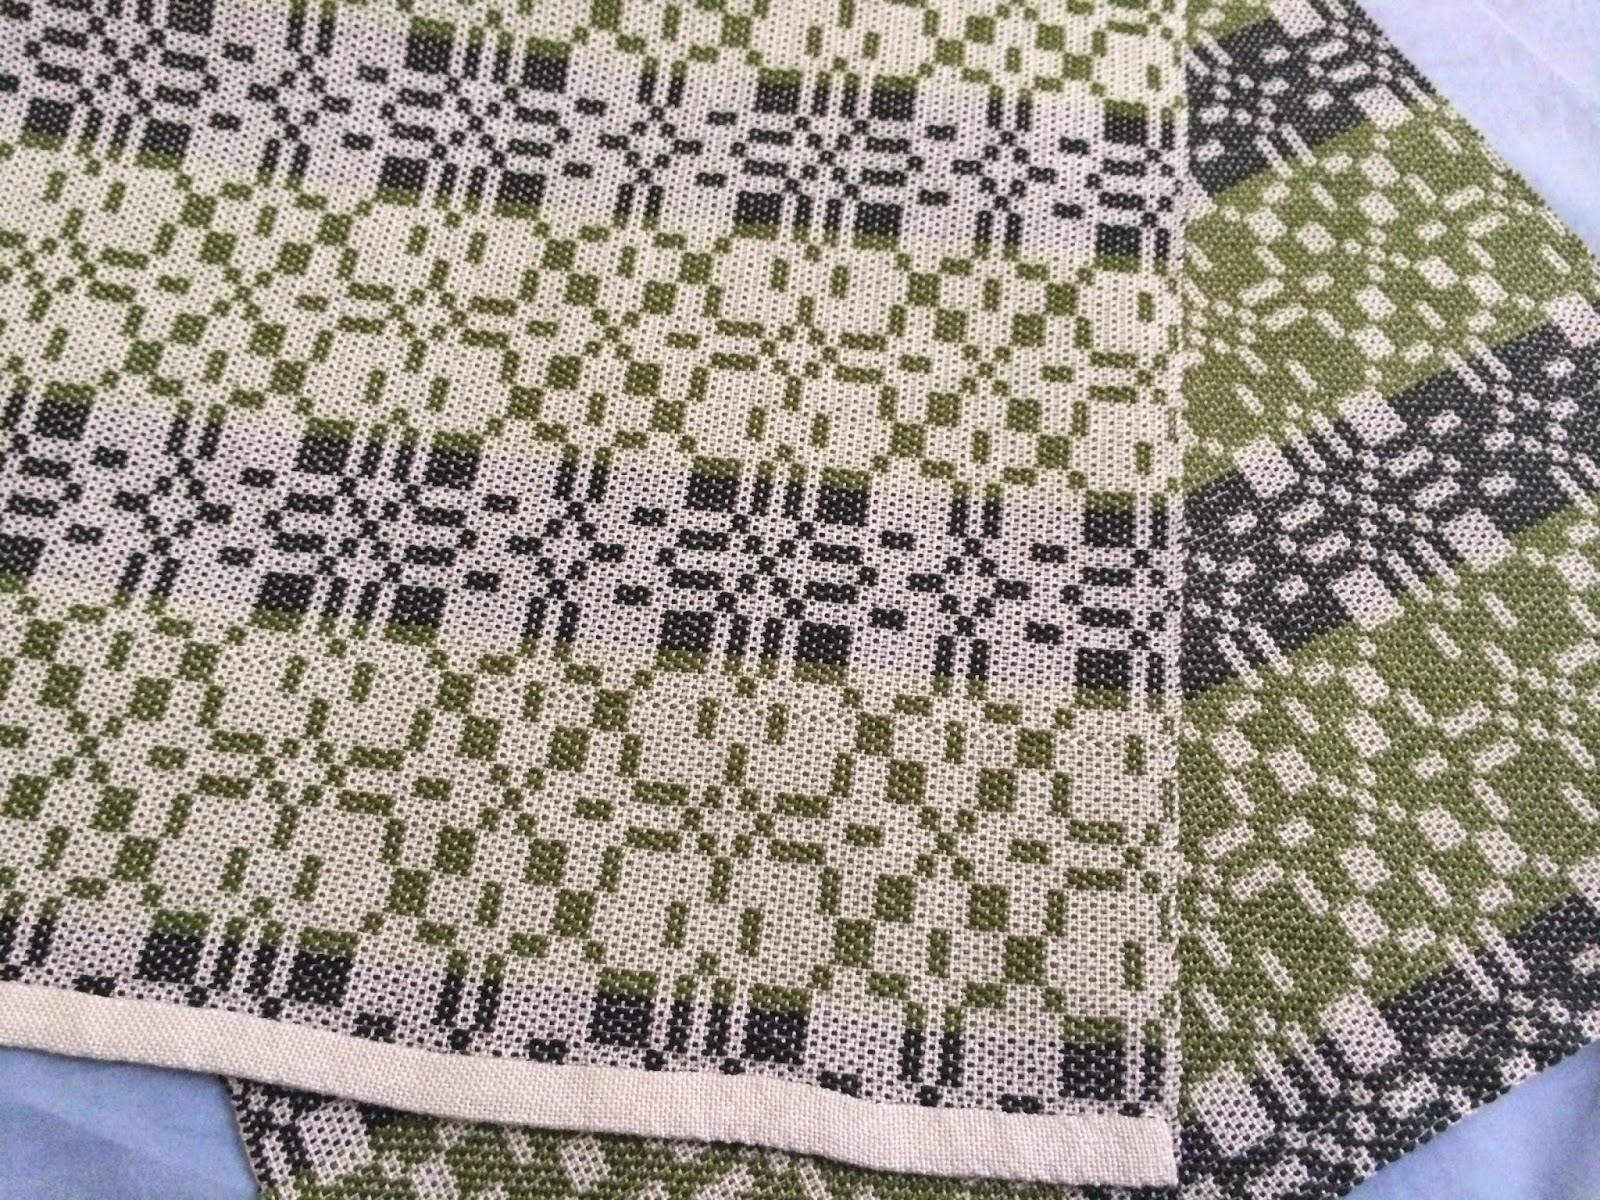
There are a lot of fun weaving structures in the world, but having tried Summer & Winter once, I have had a strong urge to keep playing with it.

I used another name draft to come up with this pattern, but then one of my weaving reference books reminded me that I can use different tie-ups with the same threading to make lots of variations on the same design.  Since I am on a table loom, I don't actually use tie-ups at all, but rather make the variations line by line, as I am doing the actual weaving.  This really opens up a myriad of possibilities for me, and as such, I decided to make a bit of a longer warp and do five different towels.

I am about halfway through the first one, and really can't wait to see how the rest turn out!

Thursday, September 18, 2014

Celebratory Towels

So it's just another photo-heavy post to show off the completed, washed & dried & ironed towels, because I'm so delighted with how they look, both individually and as a set.


Tuesday, September 16, 2014

More Twill Towels

For the fourth towel, I changed to a different set of weft colours.  This one had less contrast again, with a blue and black weft.  What a change in tone from the previous three towels!  All the colours are still there, but much more muted.


Then I brought in the brightest colour of them all, the light green, and made the fifth towel with all the contrast, in black and green.


Then I did the last one in green and blue, a little less contrast and tonally more similar.


But wait!  I finished the sixth and final towel only to realize I had tons of warp left on the loom.  When I initially planned out the pattern, I thought the magazine allowed for an unnecessarily long warp, and upon getting to this point in the weaving, I realized that I easily had room for another towel.  My first thought was to use the last of each colour to do a really variegated stripey weft, but I was sort of done with swapping shuttles and winding bobbins.  I couldn't bear to waste such a pretty warp, though, all ready to go.  I decided I'd use some spare 10/2 cotton I had, in white, without any stripes at all.  This made something completely different and a bit unexpected and I really really like it.  The colours are softened a bit, and the blocks look like changing transparencies of glass over the stripes of colours.


Now to finish them up!

Wednesday, September 10, 2014

A Set of Twill Towels

I don't know if it's just because of the change in the weather, but I got a real case of startitis this week, and began a second pair of socks for gifting, an out-of-the-blue artsy knitting concept, and I really have my eye on a new slouchy hat for fall... maybe some fingerless mitts... not to mention this baby from the new BrooklynTweed collection.

But before I get to any of that, I should catch you up on my weaving.  I did get the skully napkins off the loom (seemed like they took forever) but I haven't gotten to hemming and finishing them yet.  Instead, I got really distracted with these babies, a set of dishtowels using a bit of colour and an irregular twill weave to add interest.

There are six colours in the warp, and I chose two of those for the weft of each towel.

The first towel had a red and pink weft.  The two colours didn't have much contrast, but it still looks quite nice:


Then came a towel with an orange and red weft:


Then one with a pink and orange weft.  It looks quite similar to the last one, again since there isn't much difference between the red and pink, but there is still a different tone to it:


That last shot shows the design most clearly, since it's nice and close.  There are warp stripes in six colours, weft stripes in two, and the overall pattern is an alternating 3:1 and 1:3 twill.  The places where the twill changes is offset from the colour stripe changes, which makes the whole thing much more interesting and gives more colours to the eye.  I can't wait to see how much better they all look, once they're washed and ironed.

Next time I'll show you the other weft combinations!

Thursday, August 21, 2014

Little Skulls All in a Row

I decided a while ago that something I need in my life is a set of fancy cloth napkins.  It's all because there was a cool project in a recent issue of Handwoven (Mar/Apr 2014) for some napkins with an allover mini-overshot design, and I really fell in love with them.  Of course I had to change everything about the project to make it more 'me' and thus the skully napkins were born.

For non-weavers, "overshot" is just a type of weaving where you weave a base cloth in plain weave (in this case, grey) while making a design within that fabric with another yarn (in this case, black.) The base cloth holds it all together, while the pattern makes it fancy.

I took this particular design from Bertha Gray Hayes' book of mini overshot designs.  She called this one "Gone With the Wind" but when I look at it, I see stacks and stacks of little skulls, like the catacombs of Paris.

Thursday, June 5, 2014

The Big Reveal

Not much more to say about this project - I finished the dukagang towel (but ran out of warp so it's one repeat shorter than the other towels) and had a minor disaster (or two) with the loom right at the end, while weaving the last hem, but it all turned out ok.  I just have to do a bit of loom maintenance and we're good to go.

I was really feeling a hand-sewing vibe, so rather than machine zig-zagging between towels, I hand stitched a blanket stitch at the end of all the hems, and then turned them twice and hand sewed them all down.  They look super tidy and I am really happy with them.

Then a quick toss in the washer and a few minutes in the dryer, followed by a final ironing to dry them out completely...  and they look great!  The threads all tightened up a bit and made the designs much clearer and they look so lovely.

Now for the weaving porn - showing both the light and dark faces that give the fabric its name.  They're all the same... but so different!


Wednesday, May 21, 2014

Let Me Rock You, Dukagang

And so today I began the final treadling for the Summer & Winter towels - this one is a Swedish weaving design, called dukagang (doo-kah-gong), which leaves columns of colour, as you can see.

The vertical element of this particular treadling is very strong, since both the green and white blocks have a vertical stripe.  I feel like this takes away a bit from the overall radial symmetry of the design, but I still like it a lot, and I can't wait to see the other side, which will be mostly white with the design in green.

This is the fourth and final towel, so hopefully only a few more days and I'll have these ready for the wash and then we can see what they all really look like once they're finished!

Saturday, May 17, 2014

Third Treadling

It's funny that, having done that bit of sampling at the beginning, I chose the pattern I liked best for the first towel.  Funny because I actually liked the pattern in the second towel better than the first, once I started weaving it.  It's even funnier that I like the third treadling (which I assumed would be my least favourite of the four) even more than I liked either of the first two.

I'm not sure if it's because the colours are more distinct (due to the different way the little contrast-colour-dots are laid out) or the way everything is tidy little squares, but I have been enjoying this treadling a lot.  The only unfortunate thing is how blurry it looks because of the alternating threads at the edges of the blocks.  Well, to be fair, the other unfortunate thing is that the picture is also just blurry.

Saturday, May 10, 2014

A New Treadling

As I mentioned last time, I decided to try a different treadling for each towel, so it's time to show the beginning of the second towel and see if you can spot the difference that the different treadling order makes in the pattern on the cloth.

At the bottom of the photo is the original treadling on the first towel - looks like little white Os on a coloured background - and at the top is the new treadling for the second towel - now it looks like little white Xs on a coloured background, and you can see how the little Xs connect together at their legs to make a design more like a lattice.  Pretty!  You'll have to imagine the back side of the cloth, for now.  It will be a light background with green Xs and Os.

It's fun to start the second towel and see how different it looks, but a bit of a challenge to keep the new treadling straight, when the first one is so ingrained already.

Wednesday, May 7, 2014

Beginning of Summer (& Winter)

In an attempt to break myself of my recent addiction to knitting nothing but a succession of quick and simple stockingette socks, I decided to start a new weaving project.  It's a set of dish towels in a weaving style called Summer & Winter.  The name is reflective of the light and dark contrasts in the cloth - one side of the towel will have a light pattern on a darker background, and the other side of the towel will have the reverse of the same pattern, this time in dark on a light background.

I did a bit of sampling before I started, since there are a few treadling variations in Summer & Winter.  I elected to use one of the variations on a so-called X-treadling.  The little Xs aren't totally apparent in this design, at the moment, but having done a couple of repeats of this pattern, I'm thinking that maybe I'll do a different treadling for each of the four towels.  Once I do another towel in a different treadling, it may be easier to see the differences that different treadlings make in the cloth.  Or maybe not.

The weave is a bit open right now, under tension on the loom (that's why the coloured spaces look like little green brick walls) but hopefully once it's not under tension and has been washed, the cotton will shrink a smidge and the weave will close up a bit.  Time will tell.

Friday, August 23, 2013

Thrace Cardigan

I finished my third Camp Loopy project about a week ago, and have worn it several times already.  It's the perfect lightweight summer cardigan, to throw on for just a bit of coverage with lots of lacy holes to let the breezes through.

When last we spoke of this, I mentioned that I was going to make the cropped version of the cardigan.  I bought the yardage for the 47" size, intending to make it a smidge smaller, since that is an inch over my size.  I knitted happily away on it and realized early on that I really wouldn't need the full 6 skeins to knit it.  I double- and triple-checked the pattern for the yardage and reassured myself that she did tell me to get a yardage that equates to 6 skeins of the Ultra Pima, to make the cropped version of the cardi.  It became quickly apparent that if I were to knit the cropped version (with my smidgen of adjustment) it would only take 3 skeins!!  Since I had so much yarn and lots of time left to complete this project before the end of August, I decided I might as well knit the longer version and use up the rest of the yarn.  Having done so, I still only used 4 of the 6 skeins, so I really don't know what the designer was thinking in recommending so much yardage.


This cardi was really quick and fun and easy (a wonderful combination.)  You begin on the back, by knitting a rectangular lace panel.  After a couple of repeats, I had the pattern memorized, which meant that I basically didn't need to refer to the pattern at all for the rest of the cardigan, save for points where I pick up stitches or bind off a certain number, etc.  You pick up stitches for the back from that panel, and cast on a bunch for the front, then knit the lace until you get to the side seam, where you do a three-needle bind off and then proceed to knit the sleeve in the round.  After doing both sides, you pick up stitches to knit the bottom half of the body down toward the hem.  I didn't actually worry about the measurement there, but just knit it to the length I thought was right for me.  Then you pick up stitches again for the ribbed button band.  But no buttons, so no buttonholes!  So easy.

It took me just over two weeks to knit the whole thing, and I enjoyed it a lot.  I am actually considering ordering another 3 skeins in a different colour, to make the cropped one that I wanted in the first place.

Saturday, August 3, 2013

Something Girly

I finished seaming my flowery sweater yesterday, and none too soon, since the third Camp Loopy project was due to begin.

The challenge for the final project is to make something that uses at least 800 yards of yarn.  For many petite knitters, a sweater would be an obvious choice for that sort of yardage.  As a more Rubenesque knitter, 800 yards isn't a whole heck of a lot for a full-sized sweater.  Of course, I could have chosen to knit something else, like a large laceweight shawl or a baby blankie or something, but I had a hankering to make a sweater.

Once again, I made a search of my Ravelry favourites list and came up with a few contenders.  The one I ultimately chose to use for my final Camp Loopy project is a cropped lace cardigan from Chic Knits in DK weight cotton.  I've been admiring this one for a while, and think it's pretty cute but also practical for the summer months.  It has an unusual construction (been going for that a lot, lately) where you knit a narrow lace back panel and then pick up stitches from there for the rest of the back and sleeves.  It's finished off with some nice ribbing and that's it - no buttons or anything complicated.  Just what I need for some (relatively) mindless summer knitting.

Sunday, July 28, 2013

Pretty Petals

Last week, I showed you a little teaser of the back of a cotton t-shirt I'm knitting.  On Friday night, I finished that piece and cast on for the front.

I wanted to knit the back first, to figure out exactly what I was doing, since the original design calls for both the front and back to be knitted in five separate pieces and seamed together.  While I don't mind a nice evening of mattress stitch, that seemed like a crazy amount of extra work when they could easily be knit in one piece for back and one for front.  However, doing so also means doing a lot of configuring and a lot of what knitters dread most: shaping that happens "at the same time..."

I had to put the shaping for all of the pieces together in one monster piece, and I thought it would be easier to do that on the plain stockingette of the back.  Having figured all that out, it's easy now to concentrate on enjoying the pretty flower pattern on the front of the t-shirt, bobbles and all.

Tuesday, July 23, 2013

Blast from the Past

I have a big stash of knitting yarns, it's true.  Enough for several sweaters and shawls and innumerable socks.  Most of the time, I've bought the yarn with a specific project in mind.  Of course, when I bought it, I was chomping at the bit to get started on that particular project.  All too often, I get distracted by one thing or another, and it is shelved while I get excited about something else.  In some cases, the yarn has been sitting in there for ages, just waiting for me to be inspired to pick it up again.

This particular project has been in my Ravelry queue for four years.  It's a summer project - a little cotton t-shirt - so every summer I intend to make it, and then the summer sneaks on by and I put it back down the queue for next summer.  Well, a couple of days ago, having finished the afghan, the shawl, the hats, I realized how few projects I had on the needles right now.  And I can't start my next Camp Loopy project until August 1st, so...  I felt inspired to cast this one on, and didn't hesitate.

Perhaps it looks a bit odd right now for a t-shirt, but all will be revealed soon enough.  (I hope.)

Tuesday, June 11, 2013

Name Draft Towels

I love weaving for many reasons, but one of the cool things about it is that it's pretty easy for even a beginner to make up original designs and play around to make something new and interesting.

One fun way for a weaver to personalize a design is something called a name draft.  You can use a name or phrase of some sort and assign blocks to each letter (i.e. some of the letters of the alphabet will end up a blue block, some will end up a white block in this example.)  Then when you repeat the letter blocks across the width and length of the piece, it will hopefully make a pleasing design.

The story for these particular towels starts with a friend of mine that I've known for a couple of decades (yes, I'm that old.)  When I reconnected with him two months ago, he was in a real transition period in his life, just settling into a new place and starting anew.  I thought it might be a nice idea to make him a little housewarming gift, and wrote up a draft for these towels.  It took a while to get the appropriate yarn in the mail, but once I did, I started them right away.  A bit of a hiatus while I was away in Jasper, and while I was working on more time-sensitive stuff, meant that they didn't get finished as quickly as they could have.  I had them off the loom a few days ago, and hand sewed the hems down.  Tonight I finally managed to get them washed and ironed and photographed so they're ready to go.  By the time he gets them, he'll be well-settled into his new place, but hopefully he'll like them, nevertheless.

The towels are woven from soft and strong Aurora Earth, an unmercerized cotton from Cotton Clouds, and I really enjoyed weaving with it.  It's not shiny and smooth like a mercerized cotton would be, but it's really tough, and the colours are saturated.  I'm pretty pleased with the end result, and I'm glad to have a bit of leftover yarn, so I can use these colours to play again.

Saturday, May 11, 2013

The New Weaving Project

I finally got my loom Miss Bennet warped for my new weaving project, and did some sampling yesterday to make sure it was going to work out all right.  All was well, so I did the hem (the blue stripe at the bottom) and then started the weaving proper today.

It's a set of dishtowels, three in total.  A nice deep royal blue for the warp, and the weft will be a different colour for each of the three.  This one might look fairly white in the photo, but it's actually a baby blue.

So far it's going pretty well - I have the beat figured out so it's turning out nice and square, and the pattern is showing up just as I'd hoped.  One repeat done, with six repeats per towel.  A good beginning, with a long and enjoyable weaving road ahead.

Friday, April 5, 2013

Striped Cotton Hat, Redux

Many years ago, I saw a hat pattern by British designer Kim Hargreaves, which was a little reverse-stockingette striped slouchy hat, in cotton yarn.  Even as a new knitter, I knew it wasn't worth buying the $30 pattern book for it, so I just went out and got some cotton yarn in natural and charcoal and faked it.

The hat turned out super cute, but the band (since it was also in reverse-stockingette) curled like crazy.  It made it really hard to wear, since it tended to want to curl up my forehead and disappear.  Despite loving the hat, I barely ever tried to wear it because it was kind of frustrating to try to make it work.

Flash forward to yesterday, when I saw the hat sitting in the closet, all cute and springtimey, and was sad (again) that I don't wear it much.  Then I had an insight - knit a lining for the hat band so it won't be able to curl anymore!  A couple of hours and a bit of knitting later, and my hat band has a lining and actually works as a functional hat!

This one will be getting a lot of wear this spring & summer, to make up for all those years it was neglected.

(p.s. upon taking another look at the Ravelry pattern page, it appears that she has re-released this hat pattern, in bright colours and in regular stockingette, rather than reverse (which I feel takes away a bit of the charm but hey) and it mentions that the band is in garter stitch, which obviously wouldn't curl.  So if you decide to fake this hat, too, do the band in garter stitch and save yourself some heartache.  Just remember to go down a needle size (or two) since garter stitch is wider than stockingette.)

Sunday, December 16, 2012

Placemats Galore

I don't make many handmade gifts for the holidays, since non-crafty folks don't always see the love and time and thought that went into them.  Every year, though, I make a few things to give to people that I think will appreciate them.

You may remember that in September I mentioned making myself a set of placemats, having completed a couple of sets for other people.  Well, as the holidays draw nearer, I finally decided I'd better spend some time washing and ironing said placemats, to get them ready for gifting.

They turned out quite lovely: a set in huck, in Bermuda Blue, and a set in huck lace, in Charcoal, for two people that I think will love those colours.  Then of course my own set, which I previewed at the time, also in huck lace, in Frost Grey.  All of them are 3/2 cotton (the first two from Cotton Clouds, and the third from Webs.)  While I love them all, I have to admit that I think the Frost Grey yarn was my favourite, and even better, it was actually the cheaper of the two.

I've got another exciting weaving project planned for first thing in the new year, but at the moment, my crafting table is covered with a different project: a new quilt!

Saturday, September 8, 2012

Some Fancy Placemats

I've been doing a fair bit of weaving in the last week or so, making a couple of sets of placemats for holiday gifts.  (Yes, I know it's only September.  That's when holiday planning starts, right?)  Having finished those, I decided to whip up a little gift to myself, and make some new placemats for our own kitchen table.

These ones are similar to the Burnt Sienna ones I made for my Mom a while back, although those were simply huck, and these are huck lace.  If you look at the photo, you can see that the center of the mat is a bunch of little squares, alternating between horizontal and vertical floats, with little spaces between them.  Once they are off the loom and washed, those holes should open up even more as the threads all cuddle up against each other.  I've made mine in a fancy frost grey colour - with any luck, they'll class up this joint a bit.

Tuesday, May 8, 2012

Burnt Sienna Placemats

Last time I went to visit my folks, I noticed that my Mom is using the same green placemats that she's had forever (despite redecorating a time or two.)  I decided to take it upon myself to weave her some new ones, to refresh her table setting.  After colluding with my sisters a bit about what colour to use, I settled on a lovely Burnt Sienna colour, which is not something I would use in my own house, but I think she'll like them.

I followed a simple huck draft I got from the free Interweave eBook Free Handweaving Projects for Beginners (originally from Handwoven Magazine Nov/Dec 2009.)  Someday I think I'll make myself a similar set (probably in huck lace) in grey, but for right now, I made her two sets in this deep orange.  I ended up with nine in total, which is should be enough for everyone plus extra for a table centerpiece.  Because my beat wasn't always perfect, there is a bit of variation in size, but I guess the largest one can be used for the table center, and hopefully everyone will be too distracted by her delicious food to notice that their placemats aren't entirely identical in length.

The sett for these was 12 epi, which means that they were quick to sley (only 177 ends.)  They were also quick to weave:  although I started the project ages ago, I actually wove the last four placemats in just three days.  The huck draft is one that I've woven before, early on in my weaving life, but I feel like I did a better job of it, this time.  The front of the fabric has floats in a vertical direction, which are spaced out a bit more than the floats on the back, which pull in a bit closer, in a horizontal orientation, and look a bit more like a polka dot.  I'll let my Mom decide which way she prefers to display them.

Now I just have to decide which of my many weaving projects to work on, next!