Saturday, January 31, 2009

What Was I Thinking? a.k.a. What Happened to the Topographie Yoke?

So I found out yesterday that a new yarn store is opening just a few blocks from where I live (and also from where I work.) I was ridiculously overexcited about it, and today on my lunch I popped over (with a wonderful knitterly friend) to check it out. I knew in my soul that I wouldn't be able to resist buying some yarn (you know, to unselfishly show support for a fledgling business) so I went armed with cash and an open mind. The place is teeny weeny, but had a selection of nice yarns, a few needles and bags, and some pattern books. I thought about buying some of the delicious sock yarn (read: Noro Kureyon sock weight) but decided I have enough sock yarn in my stash (and I haven't even told you about my recently-acquired Socks that Rock, yet) so I grabbed a few balls of Noro Silk Garden, instead. See, Yarn Harlot spent a large part of November and December knitting up so many ribbed Noro scarves, and they were all pretty gorgeous. So I thought I'd take a crack at one. I picked up some Silk Garden in 205 (pinks/purples/browns) and 255 (purple/orange/the most luscious lime green you can imagine) and thought to myself: "After I finish my Topographie Yoke and my recently-acquired Socks that Rock socks, I will make a cute little scarf out of this lovely Silk Garden."

Later in the my work shift, I thought: "After I finish my Topographie Yoke, but before I make my recently-acquired Socks that Rock socks, I will make this cute little scarf that really can't wait, and besides, it's just a wee little scarf, so it will be quick."

By the time I got home from work, I thought: "I think I will just cast on for this cute little scarf and get a couple of rows of each colour done before I sit down to work on finishing my Topographie Yoke."

So I submit to you now the beginning of my cute little scarf, far past a couple of rows of each colour, which is so soft and gloriously shiny (I've never worked with Silk Garden before, so I really had no idea -- I am more used to the scratchy-and-not-shiny-but-also-pretty Noro Kureyon.)
So to the Yarn Harlot: I really understand now why you made so many of these. They are truly addictive and so so fabulous. And I haven't even gotten to the luscious lime green part yet.

Um... what Topographie Yoke??

Thursday, January 29, 2009

Topographie Yoke: Where Arm Meets Body

My sweater was on hold for a few days, while I quickly knit up my HLM a toque during the cold weather we had last week. Alas, I have no photo of it right now, since he took it with him on his trip to NYC to see Terry Reid. When he comes back, I will get a photo and show it off. It's one of Jared's Koolhaas hats, in a nice grey.

When I picked up the sweater again, I decided to do some short rows for the bust, to add some length in that area. Any of my readers with ample bosoms will know that sweaters always ride up in front because of the extra length the fabric travels over the bust.
Now, I could have read up on how to add short rows, and how much to add, etc. Instead I just decided to wing it. I've made enough short row socks that I know the general technique. So I did three wrap & turns evenly spaced on the outside third of each side of the sweater front. I tried it on and it seems to have worked perfectly. Last night I knitted the sleeves onto the body and am making slow progress up the yoke. After a couple of inches, it will move much faster, as I will be decreasing the stitches by one-third at the halfway point of the yoke. Not long now, and I will have a completed sweater. I just need to decide how to finish the neckline.

(Weaving progress coming soon.)

Thursday, January 22, 2009

Topographie Yoke: the Middle

I've been busily knitting on my Topographie Yoke sweater for the last few days. Once I finished the sleeves and got to stop knitting magic loop style, it's been smooth sailing. I did a few decreases from hip to waist and was planning to do some increases for the bust, but today I tried it on, and decided not to.
I had planned the body to have a mere inch of ease, and somehow the translation of measurements from paper to sweater have left it looking plenty big. (Or maybe I'm just used to wearing clothes that are too small for me.) And now I'm worried that it will get bigger when I block it. This is where I start to bemoan the fact that I'm too lazy to properly block my swatches.

Anyway, as I was pulling it up and off, I settled it around the busty area, and it seemed like it fit there pretty well. So I think I'll just knit it straight to the underarms and let a bit of negative ease do the work for me. Lazy? Well, yeah, but if it works, it works.

Wednesday, January 21, 2009

Haute Geek

Martin Starr is a great actor that I've loved for ages. I first saw him a decade ago on one of my all-time favourite TV shows, Freaks & Geeks, and ever since, whenever I see him onscreen, I sit up and point excitedly. My HLM can vouch for this. (By the way, if you don't know Freaks & Geeks, rent it. Trust me.)

I love him all the more for showing up at Sundance in this.

Tuesday, January 20, 2009

the Next Big Thing

I didn't bother to mention it, last week, when I had my first Beginner's Weaving class, since all we did was learn the parts of a loom and dress it (attach the warp threads and draw them through the reed and heddles) to get it ready to start.

At the second class this week we started the real business of weaving, and got to bring the loom home to do our homework for next week. No surprise, I already have it done. There's something magical about making fabric, whether it's by knitting it or weaving it, or any other method.
This is just the sampler you're looking at -- I didn't choose these colours or this pattern. Clearly I'm just a beginner, since I still need to work on my tension and my selvedges. We're using this sampler to learn how to weave on a loom, how colours interact in weaving (which is very different from how they interact in other things like painting or quilting) and eventually will be trying different weave patterns than the basic weave you see here. After we finish playing with our samplers, we get to buy our own yarn and design something ourselves... Will it be a lovely scarf or some practical (but still lovely) towels...?

Friday, January 16, 2009

Topographie Yoke: the beginning

A while back you may have seen some yarn I dyed with Kool-Aid for a sweater project. I began the knitting last week, after I finished my socks, and have been making slow but steady progress on the sleeves.

I like knitting two sleeves at a time, using the Magic Loop method, since I will otherwise somehow manage to make them different from one another (usually by forgetting what I did on the first one.) Well, I say I "like" it, but really I find it kind of tedious -- it's still better than having two different sleeves.
As I mentioned before, I'm using the stitch pattern from the Topographie pattern in Knitty's Winter '08 edition. Basically you just take a variegated yarn and knit stockingette, but when the next stitch on the left needle is in the contrasting colour, purl it instead of knitting. It gives some really interesting texture, as you can see in the photo. I think after I block it, the ruffly nature of the knit fabric will be tamed into something smoother, but the reddish purls will still stand out.

You can see that because each skein I dyed is different, the stitch pattern will be different as well. One sleeve started out a lot more full of purls than the other, for example, but evened out as I went on. Now that I've gotten past the increases and into the upper arm, you can see that the pattern gets more regular and is making a spiral of sorts. I wasn't thrilled with it, initially, since I preferred the randomness, but it's growing on me. If I really wanted it to stay random, I could have begun to alternate skeins for each row -- that way, the repeat would have been broken up. I opted for letting the skeins speak, rather than trying to control it. After all, I dyed them myself, so I am speaking through them.

A few more inches and I will be done the arms to the armpit, and then I can cast on the bottom hem and start the body. I have to do some thinking about how fitted and/or loose and casual I want it to be...

Wednesday, January 14, 2009

Found on the Interwebs

If these aren't just the coolest thing you ever saw, then I just don't know what.

I really must find time to make them, somehow.

Tuesday, January 13, 2009

Bumbleberries!

It's been a bit of a bumpy ride, Chez Crafty, lately. On the upside, I have been making good progress on a lot of projects. On the downside, unexpected events this week have been preventing me from showing them off.

So, for the first in a series, the completed Bumbleberry socks:


As I mentioned in my first post about them, I sort of mashed two different sock patterns together to make these, and it worked out pretty well. I also varied the width of the stripes throughout the sock, starting out at the toe with 8-round stripes, and then once I was to the calf increases, I started to change the width of the stripe, as well, all the way up to 11-round stripes. This was an attempt to create an optical illusion of having narrower calves, and I think it worked pretty well, actually.

The socks are great -- I haven't had knee socks in probably 25 years, so it's quite a novelty to wear them. And it's really awesome to have a pair that aren't too tight, and are really able to stay up on their own. Totally worth all the time they took to knit.

Next time: wanna see how my sweater is coming along?

Tuesday, January 6, 2009

The Perfect London Fog

So since Starbucks has introduced the London Fog into their line of drinks, I've been drinking them constantly. Not buying them, mind you, at $5 a pop -- once I knew the basic recipe, I've been cranking them out at home every day. Wanna play along?

  • Start with a cup or so of milk in a small kettle (Creamy milk is better for this, but if you're working on a New Year's Resolution, make it half milk, half water, or use *shudder* skim milk.)
  • Add some sugar -- you be the judge of how much you will need for a pleasantly sweet tea.
  • Throw in a couple of Earl Grey teabags. I like the Double Bergamot ones from Stash, but any fragrant Earl Grey will do. Extra points if you use loose tea instead of teabags and strain it at the end.
  • Heat as slowly as you can stand it, stirring it often, if not constantly. We are looking for wisps of steam to begin rising from the surface.
  • In the meantime, put a teaspoon or so of vanilla extract into your mug. If you're still constantly stirring, you'd better be ambidextrous. Extra points if you use vanilla extract you made yourself from a recipe in Craft magazine ages ago. Double the points if you used tequila for the recipe instead of rum. Mmm. Yeah, that's good vanilla.
  • Pour milky sweet tea into mug over vanilla. Inhale deeply. Drink in ecstasy. Repeat often.

I am dark delicious vanilla extract.
And I only get better with age.

Friday, January 2, 2009

Electric Kool Aid Acid Test

So I mentioned the other day that I would be dyeing some Cascade 220 for a yoke sweater... Well, on new year's eve, I put on my alchemist hat and this is what I ended up with:


It may look like a horrible accident that would have me in tears, but believe it or not, it's pretty much what I intended -- I wanted the dye to be sparse and erratic, some large and some small blotches, with the majority of the yarn still the original colour (Duck Egg Blue, for the record.) Some of the skeins have more dye than others, since I started to run out by the last skein or two (though a couple that look undyed in the photo have more colour on the other side of the skein) -- I think I'll just use them strategically, to try to disperse the colour evenly. Or not. I wound one up so far, to see how it looks in a yarn cake, and now I'm pretty stoked to start the project.


For the dye, I used equal parts Cherry and Orange Kool Aid, to try for a colour that wasn't just bright purple but wasn't brown, either. It came out somewhere between plum and dried blood. I'm pretty satisfied with it. The only snag was that most of the KoolAid dyeing instructions out there on the web call for a microwave, or sometimes a steamer basket, neither of which I have. (Or even the sun, which is also curiously absent this time of year.) So I had to do a little extra searching to find some instructions that used a conventional oven instead. It worked fine, but my whole apartment had the sickly smell of Orange Cherry Wet Sheep for a day or two. My HLM was not impressed. I went through a lot of incense, what with my windows being frozen shut by Jack Frost and all.


In other news, I spent the last couple of days plugging away on a new knitting bag (so I'll have something pretty to store my new sweater project in, natch.) I got the pattern free from Knitting Daily ages ago, and recently saw so many nice ones on 
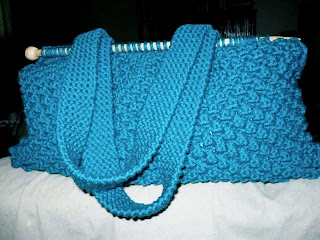
Ravelry that I had to try it out. Knitting the berry stitch so tightly for three days wasn't the best thing for me, but it turned out so nice that I can't complain. Once again, I used Cascade 220 (this time in Como Blue, which is quite a bit darker than this photo appears -- it's more accurate in the photo below) but doubled up, since the pattern calls for a much thicker yarn. And yes, if you're wondering, those are wooden knitting needles at the top of each panel (10.0mm diameter -- yikes!) The bag was knitted on much smaller needles, of course, but you end it with the big ones, and glue the stitches at the point end so they won't slide off.


The bag is totally roomy and sturdy. I lined it with leftover fishy fabric, since it sort-of matched. I was going to stabilize the handles with fabric as well, but I didn't have quite enough, so they will just stretch out, as garter stitch is wont to do. I will live with it. Right now my Bumbleberry socks are stored in there, waiting patiently to be finished. Did I mention that I turned the second heel?