As I was sitting there working on the HBC shawl a few weeks ago, one of my knitty girlfriends was working on a Baby Surprise Jacket. I was thinking about all the leftover coloured yarn I would have from the shawl and then I had an epiphany: an HBC BSJ!
I was intending to wait until after the summer to start it, since I have a few time sensitive projects these days, but then I realized I have a bit of time before the August Camp Loopy project starts, and I couldn't bear to think of finishing the sweater I'm working on in this oppressive heat, and a BSJ only takes a few days... So I cast it on and knit it up, squeeing all the way.
I thought about a few ways to incorporate the stripes, either right at the beginning (i.e. just after the sleeve cuffs) or through the main part of the body, but because the jacket itself is so wee, the stripes would have to be thin single ridges of colour to fit in most positions. In the end, I decided to put them in the "work the middle 90 stitches for 10 ridges" part of the pattern so they would just be in the hem area around the bottom, but had to upsize that section to 14 ridges to accomodate all of the colours in a 2-ridge width. The jacket ended up looking a bit long, but when I blocked it, I tugged it a bit wider and shorter and it turned out fine.
I was planning to get some little blonde wood buttons, but then I found these darker dyed wooden ones with little leaves on them, and they were so enchanting and perfect for a little outdoorsy baby that I bought them on the spot.
I still have tons of yarn left over, so I might just make this my new go-to baby gift.
Showing posts with label natural. Show all posts
Wednesday, July 30, 2014
Sunday, July 20, 2014
HBC Shawl
Of course, the thing that prompted me to finally write a post about the June shawl yesterday was because I have another shawl to write about today!
Since I was a kid, I've always loved the iconic look of the Hudson's Bay Company point blankets: a simple off-white blanket with the four wide stripes of colour. It's an instantly recognizable symbol of Canada (though admittedly not always a good one.) As they cost hundreds of dollars, I've always relegated it to the "someday" pile.
Much to my happiness, the second project for Camp Loopy was to knit something up (using at least 600 yards of yarn) that is somehow reminiscent of a favourite place. I instantly thought of the shawl Point, based on the concept of the classic HBC blanket.
The Loopy Ewe carries about a million colours of solid fingering weight yarn, in 200 yard skeins, which make it easy to stock up for striped projects. I got one little skein each of the colours (and have just tons left over) and then three skeins of the Ivory. The pattern only calls for two, but since that would give me essentially a one-skein sized shawl (like the one I posted yesterday) I elected to upsize it a bit.
The main body of the shawl is a little knit-purl pattern that adds just enough texture, particularly in a simple ivory colour, and then mindless garter stitch to make the stripes. Because I'd upsized the shawl, I also decided to make each stripe three ridges of garter stitch instead of two (i.e. six rows of knitting instead of four.) I really like it, since the stripes in the blankets are so fat and I didn't want these ones to be too thin.
Much to my dismay, the red yarn bled a bit into the ivory as it was washed. I tried a second soak to minimize it, and while that did work to some extent, you can still see the little bit of red there, if you are looking for it. I suppose I'd better wash the rest of the red before I make anything else with it, and keep that in mind in future.
Having pulled it up from drying on my bedroom floor, I couldn't wait even a moment to try it on for a selfie, without any makeup or even a sensible look on my face.
Perfect.
Since I was a kid, I've always loved the iconic look of the Hudson's Bay Company point blankets: a simple off-white blanket with the four wide stripes of colour. It's an instantly recognizable symbol of Canada (though admittedly not always a good one.) As they cost hundreds of dollars, I've always relegated it to the "someday" pile.
Much to my happiness, the second project for Camp Loopy was to knit something up (using at least 600 yards of yarn) that is somehow reminiscent of a favourite place. I instantly thought of the shawl Point, based on the concept of the classic HBC blanket.
The Loopy Ewe carries about a million colours of solid fingering weight yarn, in 200 yard skeins, which make it easy to stock up for striped projects. I got one little skein each of the colours (and have just tons left over) and then three skeins of the Ivory. The pattern only calls for two, but since that would give me essentially a one-skein sized shawl (like the one I posted yesterday) I elected to upsize it a bit.
The main body of the shawl is a little knit-purl pattern that adds just enough texture, particularly in a simple ivory colour, and then mindless garter stitch to make the stripes. Because I'd upsized the shawl, I also decided to make each stripe three ridges of garter stitch instead of two (i.e. six rows of knitting instead of four.) I really like it, since the stripes in the blankets are so fat and I didn't want these ones to be too thin.
Having pulled it up from drying on my bedroom floor, I couldn't wait even a moment to try it on for a selfie, without any makeup or even a sensible look on my face.
Perfect.
Thursday, June 5, 2014
The Big Reveal
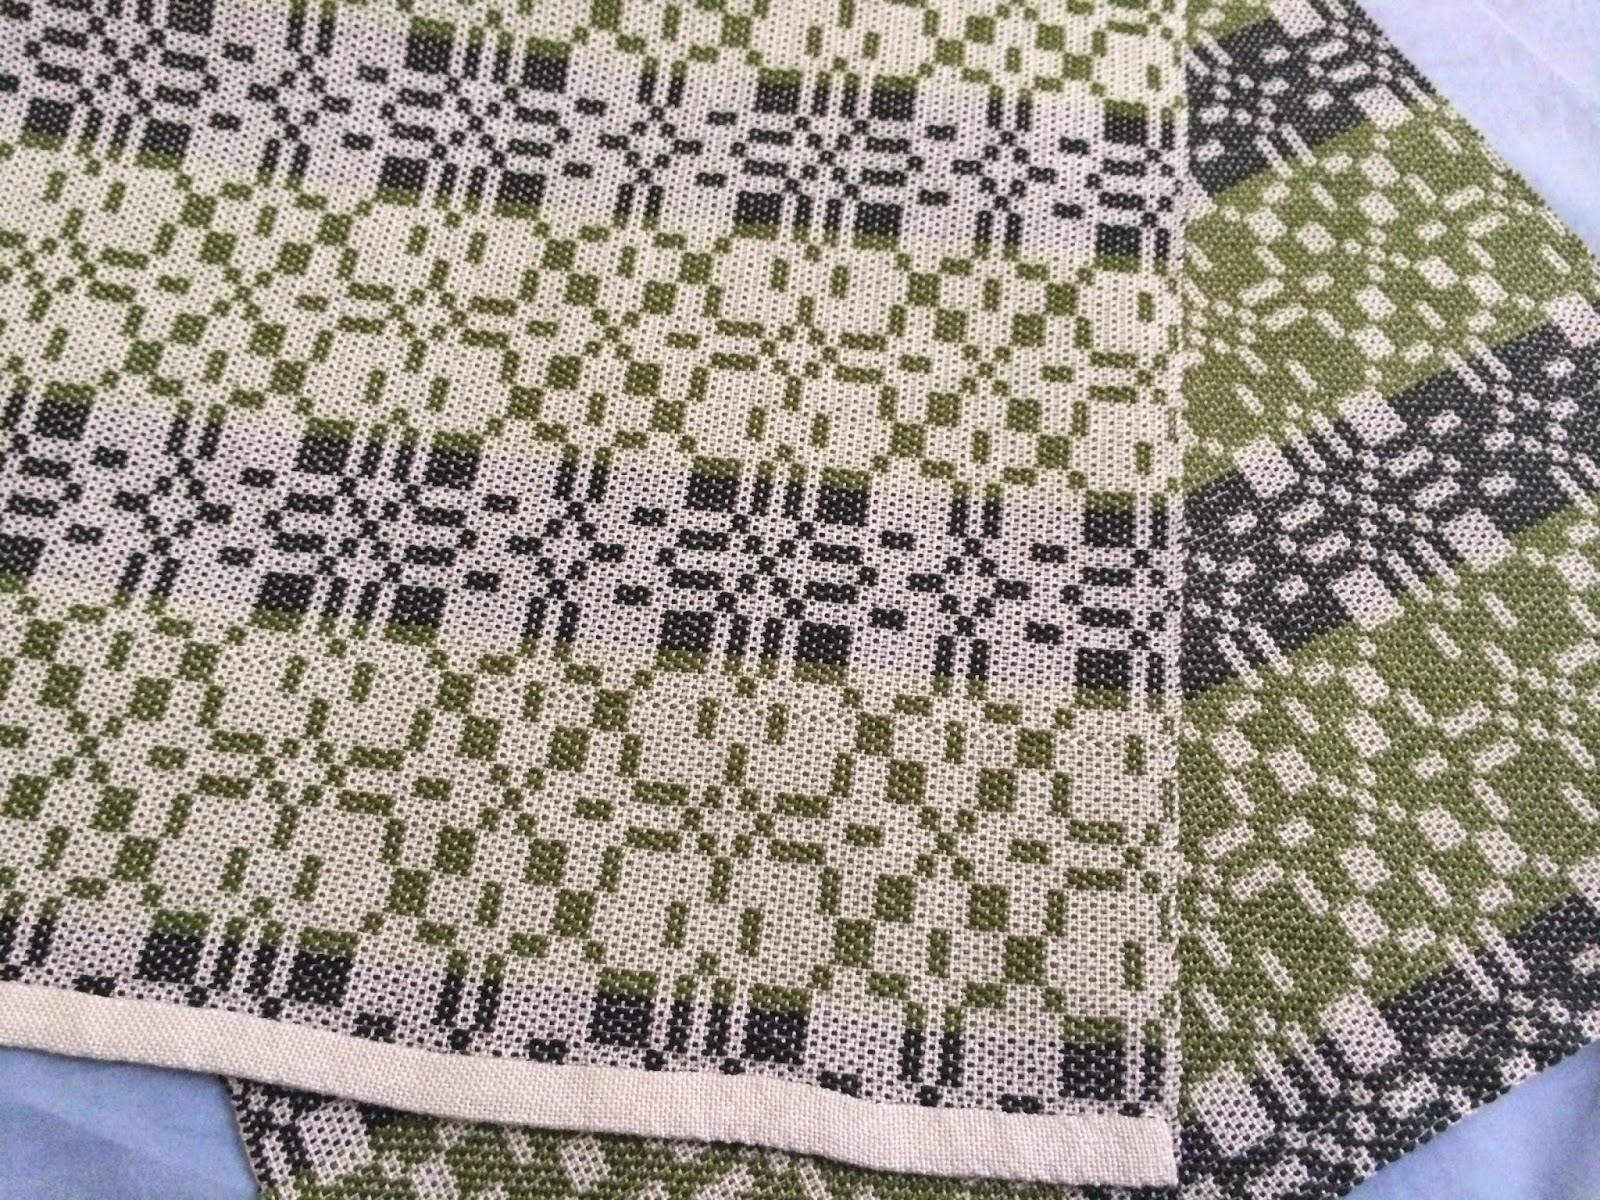
Not much more to say about this project - I finished the dukagang towel (but ran out of warp so it's one repeat shorter than the other towels) and had a minor disaster (or two) with the loom right at the end, while weaving the last hem, but it all turned out ok. I just have to do a bit of loom maintenance and we're good to go.
I was really feeling a hand-sewing vibe, so rather than machine zig-zagging between towels, I hand stitched a blanket stitch at the end of all the hems, and then turned them twice and hand sewed them all down. They look super tidy and I am really happy with them.
Then a quick toss in the washer and a few minutes in the dryer, followed by a final ironing to dry them out completely... and they look great! The threads all tightened up a bit and made the designs much clearer and they look so lovely.
Now for the weaving porn - showing both the light and dark faces that give the fabric its name. They're all the same... but so different!
I was really feeling a hand-sewing vibe, so rather than machine zig-zagging between towels, I hand stitched a blanket stitch at the end of all the hems, and then turned them twice and hand sewed them all down. They look super tidy and I am really happy with them.
Then a quick toss in the washer and a few minutes in the dryer, followed by a final ironing to dry them out completely... and they look great! The threads all tightened up a bit and made the designs much clearer and they look so lovely.
Now for the weaving porn - showing both the light and dark faces that give the fabric its name. They're all the same... but so different!
Labels:
Bennet,
cotton,
FO,
gift,
green,
natural,
Summer and winter,
towels,
weaving,
weft faced
Wednesday, May 21, 2014
Let Me Rock You, Dukagang
And so today I began the final treadling for the Summer & Winter towels - this one is a Swedish weaving design, called dukagang (doo-kah-gong), which leaves columns of colour, as you can see.

The vertical element of this particular treadling is very strong, since both the green and white blocks have a vertical stripe. I feel like this takes away a bit from the overall radial symmetry of the design, but I still like it a lot, and I can't wait to see the other side, which will be mostly white with the design in green.
This is the fourth and final towel, so hopefully only a few more days and I'll have these ready for the wash and then we can see what they all really look like once they're finished!
The vertical element of this particular treadling is very strong, since both the green and white blocks have a vertical stripe. I feel like this takes away a bit from the overall radial symmetry of the design, but I still like it a lot, and I can't wait to see the other side, which will be mostly white with the design in green.
This is the fourth and final towel, so hopefully only a few more days and I'll have these ready for the wash and then we can see what they all really look like once they're finished!
Labels:
Bennet,
cotton,
gift,
green,
natural,
Summer and winter,
towels,
weaving,
weft faced
Saturday, May 17, 2014
Third Treadling
It's funny that, having done that bit of sampling at the beginning, I chose the pattern I liked best for the first towel. Funny because I actually liked the pattern in the second towel better than the first, once I started weaving it. It's even funnier that I like the third treadling (which I assumed would be my least favourite of the four) even more than I liked either of the first two.
I'm not sure if it's because the colours are more distinct (due to the different way the little contrast-colour-dots are laid out) or the way everything is tidy little squares, but I have been enjoying this treadling a lot. The only unfortunate thing is how blurry it looks because of the alternating threads at the edges of the blocks. Well, to be fair, the other unfortunate thing is that the picture is also just blurry.
Labels:
Bennet,
cotton,
gift,
green,
natural,
Summer and winter,
towels,
weaving,
weft faced
Saturday, May 10, 2014
A New Treadling
As I mentioned last time, I decided to try a different treadling for each towel, so it's time to show the beginning of the second towel and see if you can spot the difference that the different treadling order makes in the pattern on the cloth.
At the bottom of the photo is the original treadling on the first towel - looks like little white Os on a coloured background - and at the top is the new treadling for the second towel - now it looks like little white Xs on a coloured background, and you can see how the little Xs connect together at their legs to make a design more like a lattice. Pretty! You'll have to imagine the back side of the cloth, for now. It will be a light background with green Xs and Os.
It's fun to start the second towel and see how different it looks, but a bit of a challenge to keep the new treadling straight, when the first one is so ingrained already.
At the bottom of the photo is the original treadling on the first towel - looks like little white Os on a coloured background - and at the top is the new treadling for the second towel - now it looks like little white Xs on a coloured background, and you can see how the little Xs connect together at their legs to make a design more like a lattice. Pretty! You'll have to imagine the back side of the cloth, for now. It will be a light background with green Xs and Os.It's fun to start the second towel and see how different it looks, but a bit of a challenge to keep the new treadling straight, when the first one is so ingrained already.
Labels:
Bennet,
cloth,
cotton,
gift,
green,
natural,
Summer and winter,
towels,
weaving,
weft faced
Wednesday, May 7, 2014
Beginning of Summer (& Winter)
In an attempt to break myself of my recent addiction to knitting nothing but a succession of quick and simple stockingette socks, I decided to start a new weaving project. It's a set of dish towels in a weaving style called Summer & Winter. The name is reflective of the light and dark contrasts in the cloth - one side of the towel will have a light pattern on a darker background, and the other side of the towel will have the reverse of the same pattern, this time in dark on a light background.I did a bit of sampling before I started, since there are a few treadling variations in Summer & Winter. I elected to use one of the variations on a so-called X-treadling. The little Xs aren't totally apparent in this design, at the moment, but having done a couple of repeats of this pattern, I'm thinking that maybe I'll do a different treadling for each of the four towels. Once I do another towel in a different treadling, it may be easier to see the differences that different treadlings make in the cloth. Or maybe not.
The weave is a bit open right now, under tension on the loom (that's why the coloured spaces look like little green brick walls) but hopefully once it's not under tension and has been washed, the cotton will shrink a smidge and the weave will close up a bit. Time will tell.
Labels:
Bennet,
cloth,
cotton,
gift,
green,
natural,
Summer and winter,
towels,
weaving,
weft faced
Sunday, July 21, 2013
Let's Recap: Northern Lights Capelet
This one is a real oldie - it's nearly been two years since I finished it, so it's about time I showed it off, here.The original pattern comes from Knit Picks (although it appears to only be available on Ravelry, now) and was actually designed as a cute little hooded cape for toddlers. One day I was cruising around Ravelry and I saw this version by Flint Knits (scroll forward and back through the photostream to see a few more shots of this beauty.) All she did was knit it in a worsted weight yarn rather than a sport weight, to upsize it to an adult version. Of course it looks really really gorgeous and chic.
I decided to try to recreate her magic so I ordered a bunch of Wool of the Andes from Knit Picks, in pinks and browns, and got to work. I added a couple of extra rounds of motifs to the bottom of the cape, since I wasn't convinced it would be long enough to adequately cover my bustline, otherwise.The cape itself is knit in the round, using steeks for the neck opening and for the opening at the front of the hood. This makes the stranded knitting a lot easier than knitting back and forth would be. As well, you bind off your stitches at the neckline and then pick them up again for the hood, which creates more stability at that spot.

I could have added a little crocheted loop and a button at the neckline, but I thought it might be a bit chokey, so I haven't. As well, I have to admit that I haven't really worn this one at all. As cute as it was on Ms Flint Knits, I feel a bit silly in mine. Every time I've put it on to wear it out, I end up taking it off again and wearing something else. Maybe I am just not a cape sort of a girl.
Thursday, July 11, 2013
Crazy Hat Lady
A while back, I knit a hat for my HLM (which never got a photo on the blog since he is shy of cameras) based on the hat that Opie wears on tv's Sons of Anarchy. He loves it and wears it a lot.

Recently, one of my friends, who is quickly progressing through the basics of knitting, decided she wanted to knit herself a hat in that style. We decided to do a hat knitalong, and both bought yarn and measured our heads and got to work.
The end result is a really simple slouchy hat that I love. Sorry about the crazy eyes.
After finishing that one, I had the hat bug, and pulled out some yarn and a pattern that I picked up at the knitting store in Jasper on our girls' vacation. A simple pattern by Wooly Wormhead, it knit up in a couple of days. I added a half-inch to the length, and am I glad I did - it's still not really as long as I'd wish. It's also a bit snug and wants to pull up, so it might be a donation hat, rather than one I keep. The design uses a reverse-stockingette background with a travelling twisted knit stitch across it. If I knit it again, I'd probably do a YO & SSK combo, instead, which would be easier on the hands and would give more-or-less the same effect. It would also have more stretch, so it might even stay on my head a bit better.

Recently, one of my friends, who is quickly progressing through the basics of knitting, decided she wanted to knit herself a hat in that style. We decided to do a hat knitalong, and both bought yarn and measured our heads and got to work.
The end result is a really simple slouchy hat that I love. Sorry about the crazy eyes.
After finishing that one, I had the hat bug, and pulled out some yarn and a pattern that I picked up at the knitting store in Jasper on our girls' vacation. A simple pattern by Wooly Wormhead, it knit up in a couple of days. I added a half-inch to the length, and am I glad I did - it's still not really as long as I'd wish. It's also a bit snug and wants to pull up, so it might be a donation hat, rather than one I keep. The design uses a reverse-stockingette background with a travelling twisted knit stitch across it. If I knit it again, I'd probably do a YO & SSK combo, instead, which would be easier on the hands and would give more-or-less the same effect. It would also have more stretch, so it might even stay on my head a bit better.Friday, April 5, 2013
Striped Cotton Hat, Redux
Many years ago, I saw a hat pattern by British designer Kim Hargreaves, which was a little reverse-stockingette striped slouchy hat, in cotton yarn. Even as a new knitter, I knew it wasn't worth buying the $30 pattern book for it, so I just went out and got some cotton yarn in natural and charcoal and faked it.
The hat turned out super cute, but the band (since it was also in reverse-stockingette) curled like crazy. It made it really hard to wear, since it tended to want to curl up my forehead and disappear. Despite loving the hat, I barely ever tried to wear it because it was kind of frustrating to try to make it work.
Flash forward to yesterday, when I saw the hat sitting in the closet, all cute and springtimey, and was sad (again) that I don't wear it much. Then I had an insight - knit a lining for the hat band so it won't be able to curl anymore! A couple of hours and a bit of knitting later, and my hat band has a lining and actually works as a functional hat!
This one will be getting a lot of wear this spring & summer, to make up for all those years it was neglected.
(p.s. upon taking another look at the Ravelry pattern page, it appears that she has re-released this hat pattern, in bright colours and in regular stockingette, rather than reverse (which I feel takes away a bit of the charm but hey) and it mentions that the band is in garter stitch, which obviously wouldn't curl. So if you decide to fake this hat, too, do the band in garter stitch and save yourself some heartache. Just remember to go down a needle size (or two) since garter stitch is wider than stockingette.)
The hat turned out super cute, but the band (since it was also in reverse-stockingette) curled like crazy. It made it really hard to wear, since it tended to want to curl up my forehead and disappear. Despite loving the hat, I barely ever tried to wear it because it was kind of frustrating to try to make it work.Flash forward to yesterday, when I saw the hat sitting in the closet, all cute and springtimey, and was sad (again) that I don't wear it much. Then I had an insight - knit a lining for the hat band so it won't be able to curl anymore! A couple of hours and a bit of knitting later, and my hat band has a lining and actually works as a functional hat!
This one will be getting a lot of wear this spring & summer, to make up for all those years it was neglected.(p.s. upon taking another look at the Ravelry pattern page, it appears that she has re-released this hat pattern, in bright colours and in regular stockingette, rather than reverse (which I feel takes away a bit of the charm but hey) and it mentions that the band is in garter stitch, which obviously wouldn't curl. So if you decide to fake this hat, too, do the band in garter stitch and save yourself some heartache. Just remember to go down a needle size (or two) since garter stitch is wider than stockingette.)
Labels:
cotton,
FO,
grey,
hat,
kim hargreaves,
knitting,
natural,
redux,
reverse stockingette,
stripes
Thursday, November 1, 2012
Not Quite a Burberry Scarf
When I first put these leftover shades together for a scarf, I thought of it as just a bunch of autumn tones. After weaving a bit, they started to remind me of a Burberry Scarf, if only the colours were a bit different (and of course the plaid was more regular.)
I started this one out with a warp using a 6:2:6:10:4 repeat. With only four colours, this means that it would make an irregular-looking pattern. Once I started weaving, using the same repeat, I soon realized that I wouldn't have enough of most of the colours to make the scarf long enough. I had lots of the natural, though, so I started to incorporate longer sections of natural within a random design. You can see the transition between the left and right panels. It certainly ended up an irregular scarf, but still sort of cute.
Friday, October 26, 2012
Two More for the Kids
The first colour combo I chose with the Cascade 220 is a bold one - a deep teal blue (Azure) with a lighter Lemon Yellow. I did this particular weaving draft in last year's scarves, as well, but in a colour combination that didn't have enough contrast. This one has lots of contrast, and in fact vibrates a bit when you look at it. I'm pretty sure that some kid will love this crazy scarf. I hope it gives them a bit of a puzzle, too, to figure out how there are vertical stripes on one side of the scarf and horizontal stripes on the other side.Wednesday, October 12, 2011
Allover Stars Towels

I have come to realize that one of my blogging problems is that I love the moment of the reveal so much that I often forget to post in-progress photos. Here we are again, with a project that I didn't get around to mentioning until it was already completed. Yes, it's another set of woven towels, but the last ones I'll subject you to, for a while.

After I finished the Striped Star towels, I folded up my loom and worked for a bit on a quilt top that I wanted to finish (oops, there's another work-in-progress I haven't shown off, yet.) I had several woven scarves bouncing around in my brain, but I decided to put them off until I wove one more set of towels. That's because I realized that I could just tie the warp for these towels onto the warp from the Striped Star towels (very easily because it is the same yarn at the same sett and threading) which saved me the effort of having to put 450-ish ends through the reed and heddles individually, and also saved a bit of length in the warp. Okay, that was probably greek to most of you who aren't weavers, but in simplest terms, it saved me a day or two (or four) of effort by tying the warp on. That way, I could get to the weaving part a lot sooner. I got it tied on with virtually no problems, and was weaving right away. They went quickly, with each towel taking about two days to finish.

When I mentioned to my sister that I was going to do towels with allover stars, rather than just intermittent stars where the stripes cross, she said: "Oh, won't that be awfully busy?" (She clearly takes after my mother, who says that every hexagon quilt I make looks awfully busy.) I knew it wouldn't, and thought that it would be sort of like a gingham, which isn't busy at all, but has a pleasing repetitive design. As I was weaving the first of the star towels, I realized that the threading for them was the same as the threading for gingham. The sett (how many threads are in one inch of weaving) was closer for the star design than I would want it for plain-woven gingham, but I decided to risk it, for one of the four towels, anyway. It did end up a little stiffer than the other towels, and I couldn't quite get the squares to be square (because the warp threads were a bit too close to let the weft thread push far enough between them.) Still: so cute.

I hemmed the four towels by hand and then threw them in for a machine wash and tumble dry. They shrunk a bit, and the weave collapsed in, like a waffle-weave would. I steam ironed them and they flattened out nicely and have a soft absorbent hand, like the previous set did. Oh, and did I mention that the back of the towels has the reverse design: white stars on a purple background?
Labels:
alloverstars,
cotton linen,
FO,
gingham,
natural,
purple,
towels,
weaving
Saturday, September 3, 2011
Striped Star Towels
I did a couple of posts when I began these towels ages ago, and I actually finished the weaving and cut them off the loom in mid-August, but I finally got around to taking some photos of the finished product, so you can see them in all their adorableness.
As I have mentioned, they were woven in the cotton-linen blend that I still have too much of, in a 1/3 and 3/1 twill weave. If you look in the large white spaces between the stripes, you can see the classic diagonal lines of twill. 3/1 twill, incidentally, is the weave used for denim jeans, so even if you didn't realize it, you are very familiar with it.
The warp made four towels in total, but I gave one away, so there are only three in the photo. I am already planning another set, but this time with allover stars, in violet and undyed yarn. Finishing those might get my cotton linen stash down to a more reasonable amount...
Saturday, July 2, 2011
Seeing Stars
Anyone who read yesterday's post might be wondering what I had up my sleeve with these towels. I have one word for you: stars!

If you look at the spot where the vertical purple stripes meet the horizontal purple stripes, you will see little four-pointed stars. Cool, huh.
Over halfway done weaving the first towel (and still enchanted by the way the stars appear, bit by bit, as I weave the purple rows.)

If you look at the spot where the vertical purple stripes meet the horizontal purple stripes, you will see little four-pointed stars. Cool, huh.
Over halfway done weaving the first towel (and still enchanted by the way the stars appear, bit by bit, as I weave the purple rows.)
Friday, July 1, 2011
Weaving as Therapy
I got the worst cold this week -- it started with a sore throat and then I lost my voice, and got stuffed up, and now I'm in the coughing and dripping stage. Fortunately I've also had a few days off work, so I got to lay around a bit and feel sorry for myself, instead of having to pull it together and go out in public.

The same day that I came down with a cold, I started to sley the reed for a new weaving project. There have been lots of little hiccups along the way on this one: first I realized that I was two ends short, while I was threading the heddles, so I had to add two in and move everything over. Then I started winding on the warp and snapped two warp threads, so I had to redo those two and wind the warp again. I did, and then realized I had one more snapped, so had to undo it and redo it yet again. Fortunately I had time on my hands, so I could walk away when I got frustrated (often) and come back later when I felt calmer.
Since I have tons of the Cotton Linen blend from Valley yarns (that I used to make the Sunshine Plaid towels and my Wobbly Herringbone facecloths) I am making more towels. This is a set of four towels in undyed cotton/linen, with magenta stripes, and will follow it up with two or three more in a different design, in natural and violet.
The weaving doesn't look too impressive yet, I admit. Ignore the orange bit at the bottom - that's just the header, not part of the towels. Above that is the hem, in two parts, and then the towel itself. So far just stripes, right? You just wait and see.

The same day that I came down with a cold, I started to sley the reed for a new weaving project. There have been lots of little hiccups along the way on this one: first I realized that I was two ends short, while I was threading the heddles, so I had to add two in and move everything over. Then I started winding on the warp and snapped two warp threads, so I had to redo those two and wind the warp again. I did, and then realized I had one more snapped, so had to undo it and redo it yet again. Fortunately I had time on my hands, so I could walk away when I got frustrated (often) and come back later when I felt calmer.
Since I have tons of the Cotton Linen blend from Valley yarns (that I used to make the Sunshine Plaid towels and my Wobbly Herringbone facecloths) I am making more towels. This is a set of four towels in undyed cotton/linen, with magenta stripes, and will follow it up with two or three more in a different design, in natural and violet.
The weaving doesn't look too impressive yet, I admit. Ignore the orange bit at the bottom - that's just the header, not part of the towels. Above that is the hem, in two parts, and then the towel itself. So far just stripes, right? You just wait and see.
Subscribe to:
Posts (Atom)