Showing posts with label ez. Show all posts

Thursday, July 25, 2013

Let's Recap: Anthro 101

I'm sure it's no surprise to hear that I'm waaay behind in showing things off on this blog.  Even I was surprised to see how long this one has been waiting, however.  It's over a year since I was finishing up this cardigan and wanted to show it off.  How time flies.

I won't go into great detail, here.  That old post gives all the deets on the cardi: where the inspiration came from, the yarns I used, etc.  I ended up scrapping the crocheted belt, in the end.  I just didn't feel like it did the cardigan justice.  Other than that, I think I did a pretty good job of replicating the original Anthropologie cardigan.  There are some great textures in this one, between all of the different yarns, as well as some great colours.

Another triumph for Elizabeth Zimmermann's set-in sleeve and another cute cardi for me.

Wednesday, May 8, 2013

Lil' Punkin

When I recently saw a friend of mine, who is about to have a baby, my mind went where a knitter's mind invariably would: wee little baby knits!

Since she is due in a week or two, I didn't have time for something big like a blanket, so I settled for something adorable.  EZ's Baby Surprise Jacket is one of my standards, because it is so quick and simple to knit and ends up so darn cute.

I chose a semisolid black (technically Victorian Gothic) for this one because of the mom's style, and also her colouring (which one can assume will have an effect on the baby's colouring.)  I went with Madelinetosh Sport, rather than a fingering weight, because I wanted the jacket to be a bit bigger - unlikely a sweater will get a ton of wear over Edmonton's hot summers, so hopefully it will still fit the baby in the fall.  Unfortunately I ran out of the yarn with only two rows and the bindoff row left to go.  Sigh.  Thank goodness I had some Sweet Georgia DK in Charcoal left over, which was a very close match.  Finished and seamed it and topped it off with five very cute pumpkin buttons, to commemorate the parent's wedding, which took place in a pumpkin patch.

Maybe it looks a bit Hallowe'eney, but that's ok, too.

Tuesday, July 3, 2012

Stripes

The Inspiration
Several years ago I saw a project on Ravelry that was using a cardigan from Anthropologie for inspiration.  Sadly, that project has never been completed, but it was nevertheless an inspiration to me, and I went on to begin to plan my own cardigan based on their inspiration.  In the past year or so, I've seen a lot of Missoni-type chevrons appearing everywhere, and while this particular cardigan is more of a ripple than a chevron, I still can't help but feel it might be received as trendy.  I don't think I've ever been trendy, before.
The Plan

I spent some time last fall perusing the Knit Picks website and came up with a collection of various fingering weight yarns that would work.  I was originally going to stick with the blue/neutral/brown colour scheme of the original, but somewhere along the way my own colour sensibilities set in (probably in combination with the colours available in the various yarns) and I ended up going with more of a blue/grey combo, with some purple thrown in for a pop of colour.  I worked up a plan for the stripes that reflected the tonal sensibilities of the original cardi.  Because I wanted to play not only with colour but also with texture, the yarns themselves are many and varied, including some Stroll sock (merino/nylon), some Palette (peruvian wool), some Gloss fingering (merino/silk), and some Aloft (mohair/silk.)

Unblocked ripples

I started knitting the sweater (in a simple feather and fan ripple) last fall and then stalled out for some reason when I started the sleeves.  I must have been distracted by another project, whether woven or knitted.  In the past couple of weeks, I rediscovered my inspiration, picked it up again and finished the sleeves in no time.  Of course once the sleeves are done, it's a simple matter (?) of joining the body and sleeves and knitting up some seamless set-in shoulders, a la Elizabeth Zimmermann.  All I have left now is the button band, which won't actually have buttons, since I'm going with the belted version of the original Anthropologie cardi.  I crocheted a simple striped belt and now just have to work out the math for the button band (since I'm overcomplicating things, as I usually do.)  I can't wait to show you the finished product!

Sunday, February 6, 2011

B&B Cardigan


I suppose I've made you wait long enough for photos of my Black & Boysenberry cardigan, and since I finally managed to throw together a few half-decent photos, today is the day.

I'm sure I've laid out the details before, but in case you don't remember, I used EZ's percentage system to knit the cardigan entirely in the round on circulars, with a steek in the front that I cut to add the buttonbands at the end.


The sleeves were also knit in the round, two at a time, and then attached at the underarms so that I could continue knitting the whole thing in the round. I used a set-in sleeve shaping and I'm really happy with how it turned out. I think I had knit the shoulder width a bit small, according to my knitting gauge, but it blocked out pretty wide when it was wet, so it actually turned out just about perfect.

I also did v-neck shaping with a steek, which made the work-in-progress look pretty weird, but after cutting, the shape is just right. I am really happy with the depth and angle of the v-neck - it really pays to measure and get out the calculator and a pencil. With an eraser.

The sleeves lengthened a bit more than I anticipated, with blocking, as well, but they are still a comfortable length. I fold the cuff back once if I want to keep them out of trouble, but otherwise, they are cozily down around my hands, keeping me warm.


As you can see, I couldn't pick just one type of button at the fabric store. It's not entirely my fault - the store didn't have eight buttons of either of the styles I wanted. It was my mom who suggested that I get four different types of buttons and mix them up, two of each. I agreed that it was just enough to give the otherwise simple cardigan a bit of personality.

The only thing I don't love is the corner where the buttonband turns to the v-neck. It is a bit floppy - I guess I did too many increases there, since I was guesstimating how many I would need. I could try to reblock them flatter, but I'm not sure it would work, anyway, since they were pretty flat while blocking the first time. Having the top button a bit higher would probably help with that, too. Live and learn.

I'm super happy with this one - it is just the size I wanted, comfortable and warm. I've been dreaming of a wide-stripe v-neck since forever, it seems. (At least since then.) I finally have one.

Tuesday, February 1, 2011

EZ Pot holder

The other night I was reading Elizabeth Zimmermann's Knitter's Almanac in the bath (what, like you haven't?) and discovered a little project she devised to practice the technique of double-knitting. It's a little potholder from bulky wool, where the sides are made of garter stitch and the center is actually two layers of knitting, back to back, made at the same time. Such a quick little project, and me sitting on all that leftover wool from my cardigan... obviously I had to make it, and right then.


Out of the bath, I cast it on, double-stranded with the worsted weight Boysenberry wool, and in an hour or two, it was done: a thick little square of wool with two layers of stockingette making a little padding in the center. Very cool. And practical, since wool is such a great insulator and won't conduct heat like cotton, when wet. Not to mention it's totally inflammable.

Aren't sheep awesome?

Wednesday, January 19, 2011

Almost a Cardigan

I put a lot of time into the striped cardigan this week, and it's paid off. I attached the sleeves to the body on Monday, and this morning finished the shaping and got ready to cut the steek. As you can see, it ended up looking a bit weird, since I did decreases for a v-neck on either side of the steek, on the upper half. That way I could keep knitting in the round and do all the shaping at once. The set-in sleeves worked really well and look good, although you can't really tell in the photo, since they are all squished together by the neckline shaping. I loved having a chance to customize where the seams sit, even if it meant doing a bit of math last night when I was planning it.

This afternoon I sat down at the sewing machine to stabilize the sides of the steek, so none of you have to worry about my sweater unravelling. Then I carefully cut it apart along the dotted line, and picked up a million stitches for the collar and buttonband. I should have the knitting done by tomorrow (dare I say tonight?) and then lay it out to block for a day or so.

The scariest thing about knitting with steeks isn't even the cutting; it's not being able to try the sweater on to see how it fits. You have to rely on your gauge swatch, your skills with a measuring tape, and knitting math. I'm not gonna lie -- I tried it on right after I cut the steek, since I was pretty nervous about it, and I'm really excited about the fit. Hopefully it will look even better with buttonbands and a good blocking.

Thursday, January 13, 2011

Getting Somewhere

The problem with having so many projects on the go at once is that progress moves slowly, overall. I've been plugging away at several of them, but only really getting anywhere on one or two, this week.


I decided to pick up the socks and do some more work, since socks are fairly quick to finish, and I would be able to get one project off the roster. (Let's not point out, just now, how I always start knitting a new pair, having completed the old one.) As you can see, I have one completed sock toe, which means one completed sock. The linen stitch suits this yarn, I think, and the star toe is not my usual, but I like it, too. The second sock is moving along, as well, but this week, I have started putting more time into the stockingette cardigan.


I cast on some sleeves on Tuesday (two-at-a-time, to make sure they're matchy) and have been going around and around since then. Having stripes helps me to keep going, since I get that "just finish this stripe" feeling while I'm knitting. Then I get the "maybe one more stripe" feeling, after that. I am really loving this cardigan, and can't wait to see the finished project.

Sunday, January 17, 2010

Colours


The ongoing yoke pullover is at long last all in one piece, since I knitted the sleeves and body together -- this means that I finally get to work the stranded yoke. I started it last night, and it took a while for my hands to remember the rhythm of stranded knitting. It was slow-going for a bit, but then it all began to feel natural again, and I made decent progress. It will start to go even faster, as I begin the decreases through the yoke and it gets progressively smaller. I can't tell you how nice it is to pick up that Granny Smith green, after knitting miles and meditative miles of plain black.


In other colourful news, my final yarn purchase of 2009 finally arrived in the mail the other day -- I have been eyeing the Corrie Vest kit on Knit Picks for ages, and since it is on sale, I decided to treat myself with one. Well, actually, with two, since the kit has enough yarn to make up to a 42" bust, and since mine is (ahem) bigger than that, I bought two kits (since I didn't know which colours I would run out of.) Not only will I have plenty to make my vest, but I will happily use the leftovers for some fair isle fingerless mitts or possibly a fantastic tam. Sweet.

Thursday, February 5, 2009

Topographie Sweater: the Big Reveal


After a skirmish or two with my photographer, I was able to get some photos of my finished sweater this morning, in the bright blinding sun.

I am super happy with how well it turned out. After blocking, it's a little bit longer than I had planned, mostly because I didn't really bother with measuring it much after I blocked it out to dry (read: the measuring tape was in the next room.) The sleeves, however, remained the perfect length. As predicted, the stitch pattern did smooth out a lot, the kool-aid stayed fixed in the yarn, and it looks pretty cool, I think. And the thing fits like a handknitted glove.

I did a lot of short row shaping in this sweater -- the back has a couple of short rows, right above the bottom hem, to add some extra length to the back of the sweater. I hate it when shirts ride up in the back.
Then I did some decreases to the waistline -- I did three in back and only two in front, every two rows. This had the added bonus of making a subtle curve in the back, which is reminiscent of a bustle. It fits well over my also-curvy fanny. Then I did some short rows at the bustline to give some added length there, so the sweater won't ride up in front, either. It fits there just perfectly. Then near the top of the yoke, I added a few short rows in back, to raise the back neck a bit. In future, I would extend those short rows around the side of the neckline, to bring the sides up a smidgen more than the front, as well.

I agonized a bit over how to finish the neckline, but opted for a basic hem to match the sleeves and bottom hem. It is about half the width of the other hems, though. I was worried that it might stand up all weird, but it just barely stands up, and I really like it, actually. I had considered doing a rolled hem (the easy way out) but couldn't stand that it wouldn't match the other hems.


I am totally enamoured of this sweater, and love how it fits (and how easy it was to do.) I didn't entirely use Zimmermann's percentage system to make it, but used a lot of my own calculations and adjustments. That's the secret of a well-fitted knit, after all. I am really excited at the prospect of making another yoke sweater in the future, with some nice fair isle in the yoke. I will have to add one to my always-ridiculously-long To Do List.

Sunday, February 1, 2009

Catching Up

I did manage to set aside the scarf long enough to make some progress on the sweater last night, and will likely finish it today (or tomorrow if I take my time.) But first I wanted to show off some little projects that I've made along the way but didn't show off until I could give them to the recipient.

One of my fabulous coworkers and her man are having their first baby very soon. We all got together and gifted her a bunch of handmade things and some other useful items, last night.

Firstly, a little Elizabeth Zimmermann bonnet that I made with some leftover Koigu KPPPM. It is very wee but so cute.


Then I made one of my requisite EZ Baby Surprise Jackets. This one used Socks that Rock Heavyweight in the colour Fire on the Mountain. My HLM refers to it as the technicolour dreamcoat and I can't say I disagree. I love this little jacket so much. Since my camera can't even handle the colours and pattern of this fabric at a distance, I am only giving you a close-up shot. (After all, you know what EZ's BSJ looks like, right?)


I found this little pattern for a Toadstool Baby Rattle on the Purl Bee, and once I stopped squealing, I grabbed some leftover yarn and whipped one up. Love.


Lastly, remember this little berry quilt? Well I didn't say so at the time, but that one was for her, too. I went for something with high contrast (for baby's developing eyesight) and wanted to incorporate food in the design, since daddy is a chef.

I honestly had a really hard time stopping. Once you start finding cute ideas for little baby things, it's hard to put the brakes on. Fortunately I got selfish and started making more things for myself. And on that note, it's back to the sweater...

Thursday, January 29, 2009

Topographie Yoke: Where Arm Meets Body

My sweater was on hold for a few days, while I quickly knit up my HLM a toque during the cold weather we had last week. Alas, I have no photo of it right now, since he took it with him on his trip to NYC to see Terry Reid. When he comes back, I will get a photo and show it off. It's one of Jared's Koolhaas hats, in a nice grey.

When I picked up the sweater again, I decided to do some short rows for the bust, to add some length in that area. Any of my readers with ample bosoms will know that sweaters always ride up in front because of the extra length the fabric travels over the bust.
Now, I could have read up on how to add short rows, and how much to add, etc. Instead I just decided to wing it. I've made enough short row socks that I know the general technique. So I did three wrap & turns evenly spaced on the outside third of each side of the sweater front. I tried it on and it seems to have worked perfectly. Last night I knitted the sleeves onto the body and am making slow progress up the yoke. After a couple of inches, it will move much faster, as I will be decreasing the stitches by one-third at the halfway point of the yoke. Not long now, and I will have a completed sweater. I just need to decide how to finish the neckline.

(Weaving progress coming soon.)

Thursday, January 22, 2009

Topographie Yoke: the Middle

I've been busily knitting on my Topographie Yoke sweater for the last few days. Once I finished the sleeves and got to stop knitting magic loop style, it's been smooth sailing. I did a few decreases from hip to waist and was planning to do some increases for the bust, but today I tried it on, and decided not to.
I had planned the body to have a mere inch of ease, and somehow the translation of measurements from paper to sweater have left it looking plenty big. (Or maybe I'm just used to wearing clothes that are too small for me.) And now I'm worried that it will get bigger when I block it. This is where I start to bemoan the fact that I'm too lazy to properly block my swatches.

Anyway, as I was pulling it up and off, I settled it around the busty area, and it seemed like it fit there pretty well. So I think I'll just knit it straight to the underarms and let a bit of negative ease do the work for me. Lazy? Well, yeah, but if it works, it works.

Friday, January 16, 2009

Topographie Yoke: the beginning

A while back you may have seen some yarn I dyed with Kool-Aid for a sweater project. I began the knitting last week, after I finished my socks, and have been making slow but steady progress on the sleeves.

I like knitting two sleeves at a time, using the Magic Loop method, since I will otherwise somehow manage to make them different from one another (usually by forgetting what I did on the first one.) Well, I say I "like" it, but really I find it kind of tedious -- it's still better than having two different sleeves.
As I mentioned before, I'm using the stitch pattern from the Topographie pattern in Knitty's Winter '08 edition. Basically you just take a variegated yarn and knit stockingette, but when the next stitch on the left needle is in the contrasting colour, purl it instead of knitting. It gives some really interesting texture, as you can see in the photo. I think after I block it, the ruffly nature of the knit fabric will be tamed into something smoother, but the reddish purls will still stand out.

You can see that because each skein I dyed is different, the stitch pattern will be different as well. One sleeve started out a lot more full of purls than the other, for example, but evened out as I went on. Now that I've gotten past the increases and into the upper arm, you can see that the pattern gets more regular and is making a spiral of sorts. I wasn't thrilled with it, initially, since I preferred the randomness, but it's growing on me. If I really wanted it to stay random, I could have begun to alternate skeins for each row -- that way, the repeat would have been broken up. I opted for letting the skeins speak, rather than trying to control it. After all, I dyed them myself, so I am speaking through them.

A few more inches and I will be done the arms to the armpit, and then I can cast on the bottom hem and start the body. I have to do some thinking about how fitted and/or loose and casual I want it to be...

Friday, January 2, 2009

Electric Kool Aid Acid Test

So I mentioned the other day that I would be dyeing some Cascade 220 for a yoke sweater... Well, on new year's eve, I put on my alchemist hat and this is what I ended up with:


It may look like a horrible accident that would have me in tears, but believe it or not, it's pretty much what I intended -- I wanted the dye to be sparse and erratic, some large and some small blotches, with the majority of the yarn still the original colour (Duck Egg Blue, for the record.) Some of the skeins have more dye than others, since I started to run out by the last skein or two (though a couple that look undyed in the photo have more colour on the other side of the skein) -- I think I'll just use them strategically, to try to disperse the colour evenly. Or not. I wound one up so far, to see how it looks in a yarn cake, and now I'm pretty stoked to start the project.


For the dye, I used equal parts Cherry and Orange Kool Aid, to try for a colour that wasn't just bright purple but wasn't brown, either. It came out somewhere between plum and dried blood. I'm pretty satisfied with it. The only snag was that most of the KoolAid dyeing instructions out there on the web call for a microwave, or sometimes a steamer basket, neither of which I have. (Or even the sun, which is also curiously absent this time of year.) So I had to do a little extra searching to find some instructions that used a conventional oven instead. It worked fine, but my whole apartment had the sickly smell of Orange Cherry Wet Sheep for a day or two. My HLM was not impressed. I went through a lot of incense, what with my windows being frozen shut by Jack Frost and all.
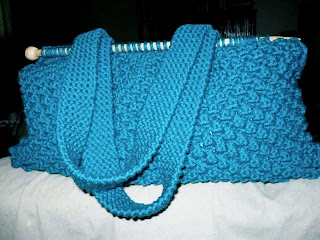

In other news, I spent the last couple of days plugging away on a new knitting bag (so I'll have something pretty to store my new sweater project in, natch.) I got the pattern free from Knitting Daily ages ago, and recently saw so many nice ones on Ravelry that I had to try it out. Knitting the berry stitch so tightly for three days wasn't the best thing for me, but it turned out so nice that I can't complain. Once again, I used Cascade 220 (this time in Como Blue, which is quite a bit darker than this photo appears -- it's more accurate in the photo below) but doubled up, since the pattern calls for a much thicker yarn. And yes, if you're wondering, those are wooden knitting needles at the top of each panel (10.0mm diameter -- yikes!) The bag was knitted on much smaller needles, of course, but you end it with the big ones, and glue the stitches at the point end so they won't slide off.


The bag is totally roomy and sturdy. I lined it with leftover fishy fabric, since it sort-of matched. I was going to stabilize the handles with fabric as well, but I didn't have quite enough, so they will just stretch out, as garter stitch is wont to do. I will live with it. Right now my Bumbleberry socks are stored in there, waiting patiently to be finished. Did I mention that I turned the second heel?

Sunday, July 20, 2008

February Baby Sweater


Well, I am finally giving away one of the baby projects I was working on, so y'all finally get to see it. It's Elizabeth Zimmermann's Baby Sweater on Two Needles (ravelry), better known as the February Baby Sweater, from her Knitter's Almanac. This is the first one I've ever made, and very quick, easy, satisfying. I used Blue Moon Fiber Arts' Socks that Rock in Heavyweight for it, and I really like how it turned out. The variegated colour pools a bit and stripes a bit and is random for a bit, but I think it looks cool. And the shiny little taupe buttons that I dug out of the bottom of my sewing kit are just about perfect. It's a bit bigger than I had anticipated, at this gauge... If I make another, it will more likely be in the light or medium weight instead. But then, babies do come in all sizes.

As for the quilt, I have spent a couple of days just Being With It. Once I arranged the diamonds and partially sewed them together with some sashing, I started to get concerned that it was not just bright and cheery, but perhaps... dare I say... garish? Like on the verge of clowny? Oh dear. So rather than panicking about whether it will turn out beautiful (since I can somewhat recognize that this is just the moment in my relationship with a project where I start to think it might be regrettably horrible and unwanted by the recipient) I have instead decided to just live with it and look at it for a few days without judgement and worry. (Particularly since the recipient is me.) Likely tomorrow I will grab the rest of the sashing and take the next step toward sewing the top together. I will take some photos when I can, and let y'all be the judge.